Bootstrap 可以視為一套前台框架,官方已經把大量 CSS 寫好,開發時直接引用即可(官網:https://www.bootcss.com)。它最大的好處,就是把前端做樣式配置的時間大幅壓縮下來。
要使用它,先到官網下載正式版。Bootstrap 3 與 2 並不相容,建議直接照 3 的開發文件走。解壓之後,把 css、fonts、js 三個資料夾複製到站點目錄;若使用 Eclipse 的 JSP Web Project,就放到 WebRoot 底下。之後站點內任何頁面都能引用它快速建模。
不過要注意,各家瀏覽器對 Bootstrap 的解讀並不一致,IE 有若干樣式讀不出來,但基本功能不受影響,最壞情況就是頁面醜一點。下圖是 IE 與 Chrome 開同一頁的對照:

一、成品目標

要做的是一個 PC、平板、手機都能用,而且外觀體面的登入頁。在 PC 上拖動視窗寬度,各元素會自動重排適配。

用手機開啟時,頁面會直接贴合螢幕寬度,使用者不必再手動縮放。

二、版面構想
依 Bootstrap 既有的元件規劃,大致如下:

三、實作過程
<!DOCTYPE HTML PUBLIC "-//W3C//DTD HTML 4.01 Transitional//EN">
<html>
<head>
<title>登入頁面</title>
<meta name="viewport" content="width=device-width,initial-scale=1.0,user-scalable=no">
<link href="css/bootstrap.css" rel="stylesheet" media="screen">
</head>
<body>
<div class="panel panel-info">
  <div class="panel-heading">
    <table frame="void">
      <tr>
        <td><img src="images/img0.jpg" width="300px" height="300px" /></td>
        <td>歡迎。請您先登入。</td>
      </tr>
    </table>
  </div>
  <div class="panel-body">
    <form class="form-horizontal" role="form" action="1.html" method="post">
      <div class="form-group">
        <label for="username" class="col-sm-2 control-label">使用者名稱:</label>
        <div class="col-sm-10">
          <input type="text" name="username" class="form-control" placeholder="使用者名稱" id="username" />
        </div>
      </div>
      <div class="form-group">
        <label for="password" class="col-sm-2 control-label">密碼:</label>
        <div class="col-sm-10">
          <input type="password" name="password" class="form-control" placeholder="密碼" id="password" />
        </div>
      </div>
      <div class="form-group">
        <div class="col-sm-offset-2 col-sm-10">
          <button type="submit" class="btn btn-info">登入</button>
          <small>還沒有帳號?<a href="https://2.com">點此註冊</a></small>
        </div>
      </div>
    </form>
  </div>
</div>
</body>
</html>
1. head 標籤
只需要三行關鍵設定:標題、讓頁面自適應螢幕寬度的 viewport,以及宣告要使用 Bootstrap。
<head>
<title>登入頁面</title>
<!-- 要求頁面自動適應瀏覽器螢幕 -->
<meta name="viewport" content="width=device-width,initial-scale=1.0,user-scalable=no">
<!-- 宣告使用 bootstrap -->
<link href="css/bootstrap.css" rel="stylesheet" media="screen">
</head>
2. body 標籤
(1)最外層先寫一個 <div class="panel panel-info">,後續內容都放在它裡面:
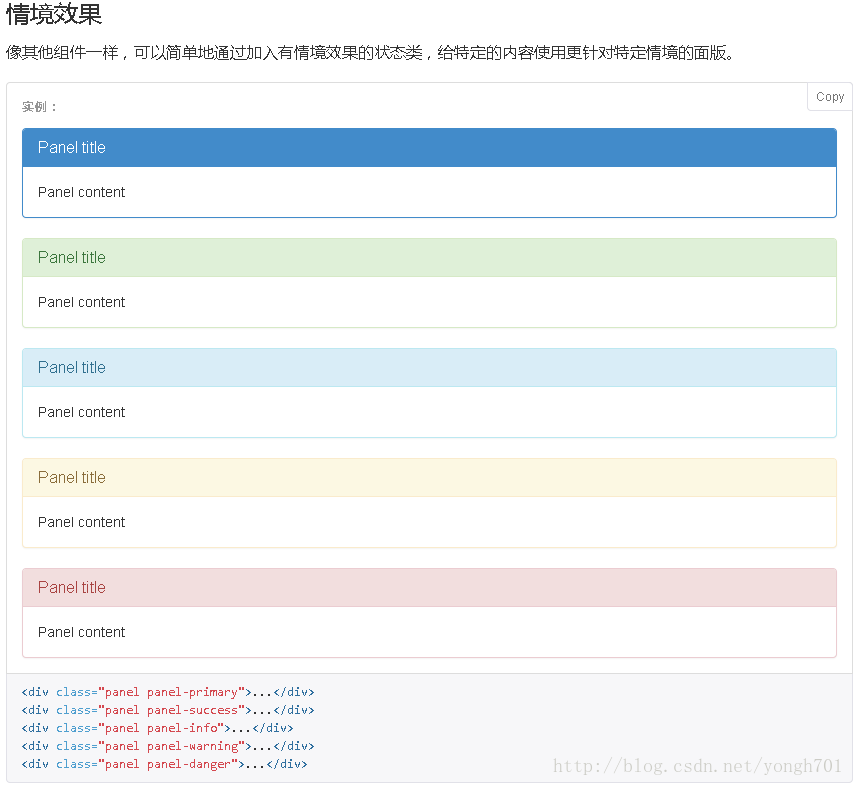
(2)panel-heading 負責頁首,這裡用一個表格把圖片與歡迎語並排。要留意的是,直接在 img 上寫 align="left" 並不好用,圖片反而會溢出圖層外,所以改用 table 排版(等同 <table border="0"> 的效果)。
<div class="panel-heading">
  <!-- 用 table 對這個圖層做版面配置 -->
  <table frame="void">
    <tr>
      <td><img src="images/img0.jpg" width="300px" height="300px" /></td>
      <td>歡迎。請您先登入。</td>
    </tr>
  </table>
</div>
(3)panel-body 裡放表單。跟 HTML 原生表單相比,這裡多了 class 與 role:class 設為 form 時,即使有空間,標籤與輸入框也不會並排;設為 form-horizontal 才會呈現如圖的水平排列。role 屬性看不出實際視覺效果,此處僅是依 Bootstrap 中文文件補上。
<div class="panel-body">
<form class="form-horizontal" role="form" action="1.html" method="post">
  <!-- 每一組「標籤 + 輸入框」就是一個 form-group -->
  <div class="form-group">
    <!-- col-sm-2 讓欄位能隨螢幕寬度自動伸縮 -->
    <label for="username" class="col-sm-2 control-label">使用者名稱:</label>
    <div class="col-sm-10">
      <!-- placeholder 是未輸入時顯示的灰色提示字,IE8 無法解讀;id 主要是配合文件要求 -->
      <input type="text" name="username" class="form-control" placeholder="使用者名稱" id="username" />
    </div>
  </div>
  <div class="form-group">
    <label for="password" class="col-sm-2 control-label">密碼:</label>
    <div class="col-sm-10">
      <input type="password" name="password" class="form-control" placeholder="密碼" id="password" />
    </div>
  </div>
  <div class="form-group">
    <div class="col-sm-offset-2 col-sm-10">
      <!-- 這個 button 與原生 submit 按鈕外觀不同,但不影響表單送出 -->
      <button type="submit" class="btn btn-info">登入</button>
      <!-- small 標籤讓這段文字與送出鈕保持同一行 -->
      <small>還沒有帳號?<a href="https://2.com">點此註冊</a></small>
    </div>
  </div>
</form>
</div>
寫到這裡,一個跨裝置的登入頁就完成了。整個過程中真正需要動腦的,其實只有柵格的欄數分配。